For the majority of homes across the United States, ceiling fans serve a fundamental purpose to keep us cool year-round while preserving energy costs. One of the most overlooked summer home renovations — and one of the top home improvement projects that can be accomplished over the weekend — is installing your own ceiling fan.
The evolution of the ceiling fan has also seen them go from eyesores to designer pieces that can compliment any room. Essentially, the addition of a good ceiling fan can not only spruce up a room, but also make it more energy efficient. Ceiling fans come in a variety of decorative styles and colors, and can be purchased at low costs, but homeowners should seek ceiling fans that are Energy Star-rated.
To install your own ceiling fan, follow these SIX simple steps from the DIY Network:
First: Make sure the electricity is turned off. Always turn off the breaker before working with any electricity. Make sure you attach a bold note to the breaker box that says, “Do not touch. I’m working with the electricity.” Read through the manufacturer’s instructions and assemble all the tools you’ll need.
Second: Install a Support Brace. Put up a support brace between the ceiling joists where you want the fan, because fans can weigh up to 50 pounds. If your ceiling is covered with drywall, you’ll need to access the joists through the attic to attach the support brace. If you’re attaching the fan where a light has already been, that’s all you need to do. But if it’s a new area, you’ll then need to cut a piece of drywall the size of your electrical box from the ceiling, so that you attach an electrical box to house the fan.
Third: Add the Fan Bracket. After taking the old light off, add the ceiling-fan bracket, simply screwing it into the electrical box with a couple of screws.
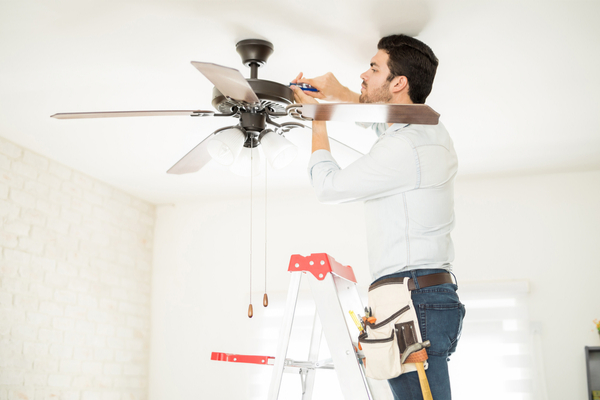
Fourth: Identify the Wiring and Install the Motor. Identify the wiring that is coming out of the electrical box. In this case, I’m working with a bare copper ground wire, the black “hot” wire and the white neutral wire. They will supply electricity to the fan. There’s also a green ground wire that goes to the fan itself. Put the fan motor in by slipping the swivel ball into the bracket.
Fifth: Match the Wires and Attach the Cover. Match the wires from the electrical box to the wires from the ceiling fan, following the manufacturer’s instructions and twisting them. Fasten the ends together with wire nuts. Stuff the wires back into the electrical box, and attach the cover. Slip the cover’s keyhole slots over the screws to keep the cover in place. Then finish attaching the screws, and slip the trim ring over the screws to cover them up. Smart Tip: Bring extra wire nuts when you go up on the ladder, so you won’t have to come back down to get more if you drop one.
Finally: Attach the Blades and Light. Attach each of the fan blades to its bracket. Use screws and a screwdriver to attach the fan blade brackets into the appropriate notches on the fan motor (Image 1). Attach the light by clicking the light connector to the corresponding fan connector and then screwing the fixture to the fan (Image 2). Last, snap the dome over the light, screwing it in place if necessary. Smart Tip: Save time by assembling the fan blades before you install the fan.
And there you have it! Of course, if all of this makes you tremble in your DIY boots, you could always call a licensed electrician.
—
Photo Credit: antoniodiaz / Shutterstock.com
